If you’ve ever used Visual Studio’s Web Deploy feature to deploy using a file share, you may have experienced issues where some files cannot be overwritten because they are in use.You may not already know this: ASP.NET Core has a built-in mechanism to take applications offline and display a message.This article describes how you can use Visual Studio’s Web Deploy feature to automatically take your web application offline while you deploy a new version, and restore it back online when deployment is complete using (pretty much) all out-of-the-box features of Visual Studio and ASP.NET Core.
Using Web Deploy
If you haven’t used it yet, the Web Deploy feature in Visual Studio pretty much does exactly what its name implies: it deploys a web application.
NOTE: It has been around for a while, and the “code” I’ll use in this article may work with earlier versions of Visual Studio, but I used Visual Studio 2017 to write this article.
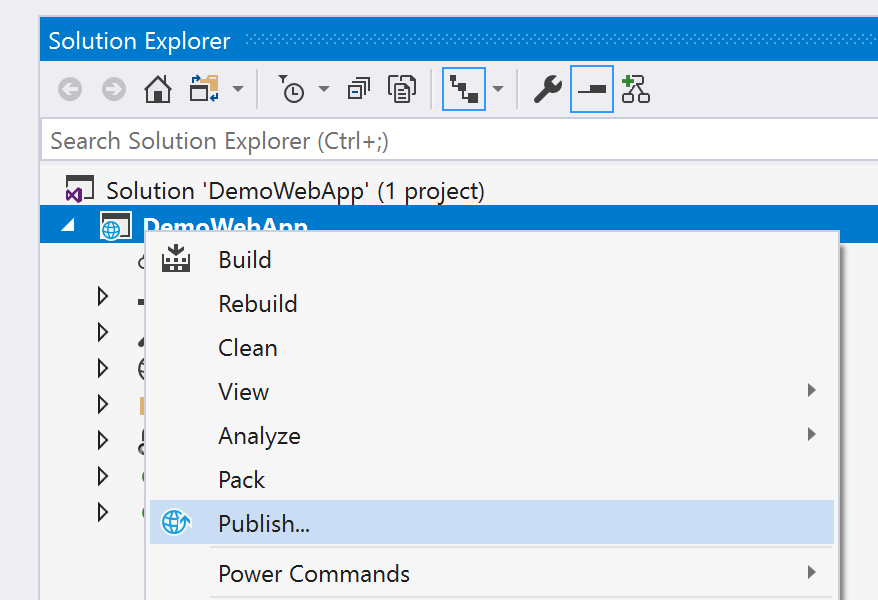
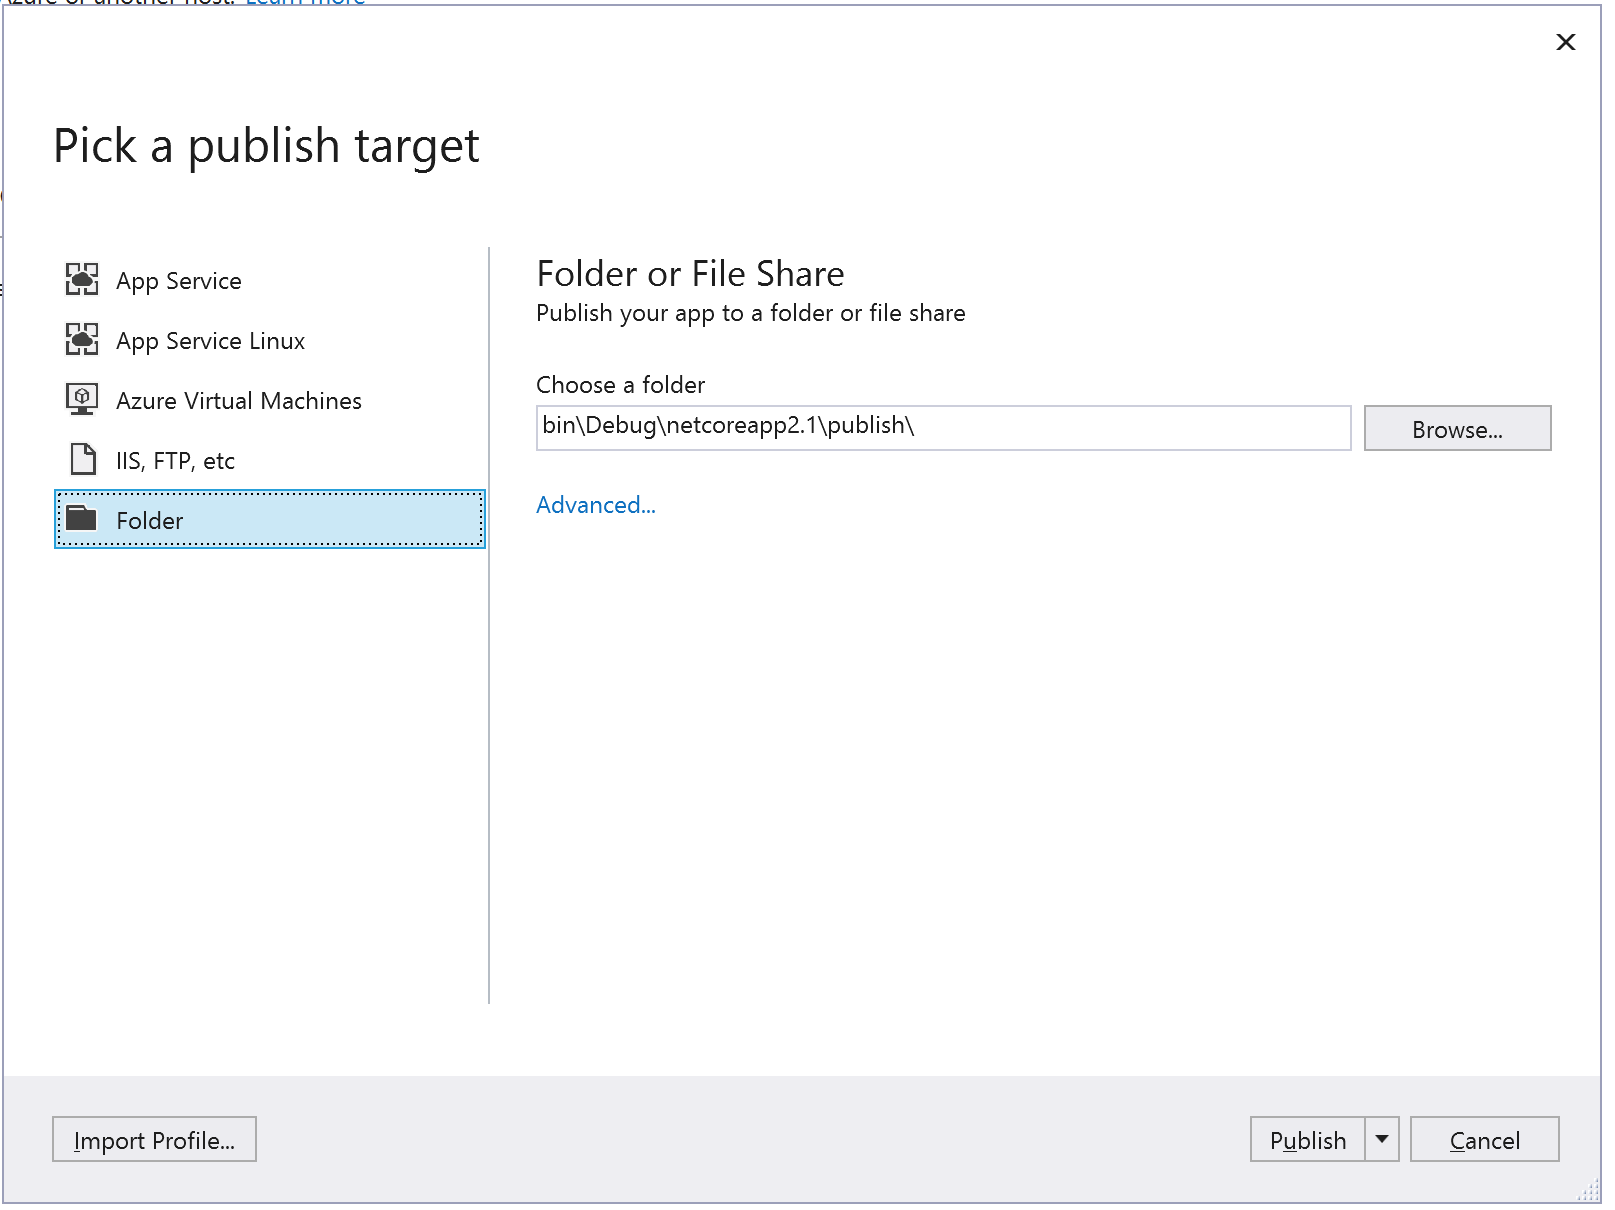
To use Web Deploy:1. From the Solution Explorer within Visual Studio, right-click on your web application project.2. From the context-menu, select Publish…3. From the Pick a Publish Target dialog, pick Folder4. In the Choose a folder field, enter the path to your web application folder. For example, I’ll use: \whousesfilesharesanymore\websites\demowebapp
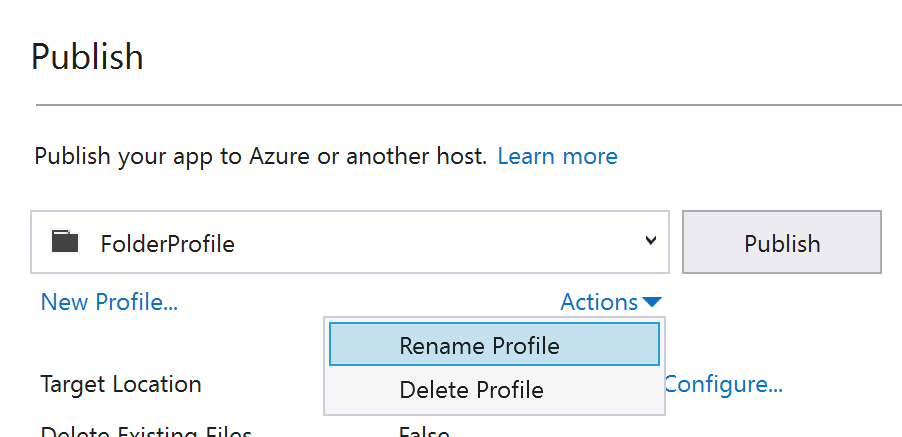
Select the drop-down option next to the Publish button and select Create Profile.
6. Visual Studio will create a profile called FolderProfile and open the Publish page for you.7. Use the chevron next to the Actions link and select Rename Profile8. Rename the profile to whatever you like. In this example, we’ll pretend that I’m deploying to my QA server, so I’ll use QAServer as the name.9. If you wish, you can set up more options by clicking on Configure… . For the purpose of this demo, I’ll just click on Publish to launch the Web Deploy feature.Assuming everything went well, your web application gets deployed to your web server without any issues.Except if you try to re-deploy your web application to a web server that has active sessions; then it says that it can’t overwrite some files because they are in use.Fortunately, that’s why ASP.NET Core has app_offline.htm.
Using app_offline.htm
Since 2012, we have been able to take web applications offline when deploying them. The mechanism is simple: ASP.NET looks for a file called app_offline.htm in the web application’s root folder. If it sees such a file, it automatically starts redirecting all connections to the app_offline.htm page and shuts down all connections that may hold a lock on your files.
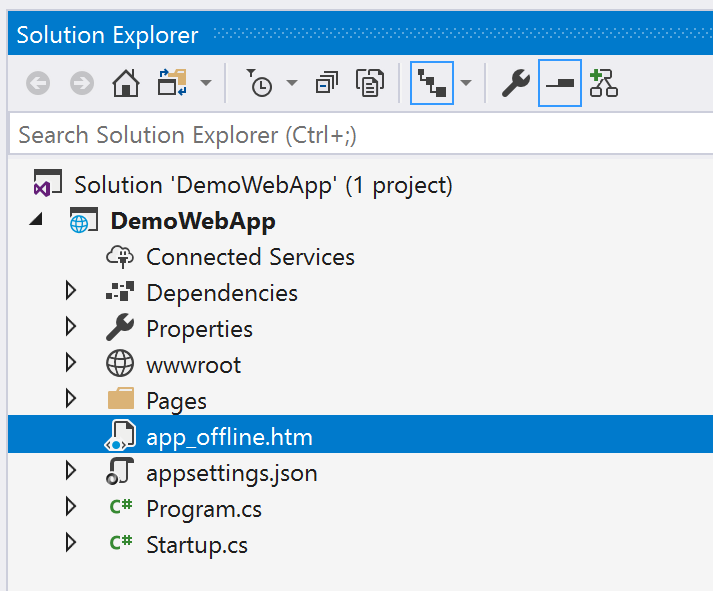
NOTE: The app_offline.htm should be in the root of your web application folder, not the wwwroot.
If you put HTML in you app_offline.htm page, the message will be displayed to your visitors as long as the app_offline.htm page is in the web application folder.
Fortunately, your pubxml (most likely) has a tag just for tag:
<SiteUrlToLaunchAfterPublish />
If you’re lucky, you might even see the app_offline.htm temporarily before your custom target removes the file and the page automatically refreshes itself to show the application online!
Honestly, you probably wouldn’t have to do this if you deployed your web app to Azure, use IIS deployment, or use CI/CD to automatically deploy after a successful build but if your client/employer is still using file shares to deploy web applications, this article should help you.I hope this helps someone! Let me know in the comments.Here is a sample app_offline.htm that I use:
Nothing special, except that on line 19, I add a META HTTP-EQUIP=”refresh” tag to refresh the page every 5 seconds. That way, the page reloads automatically when the site goes back online.If you want to restore the application online again, go to your web application’s folder and remove (or rename) the app_offline.htm.
Debugging with app_offline.htm
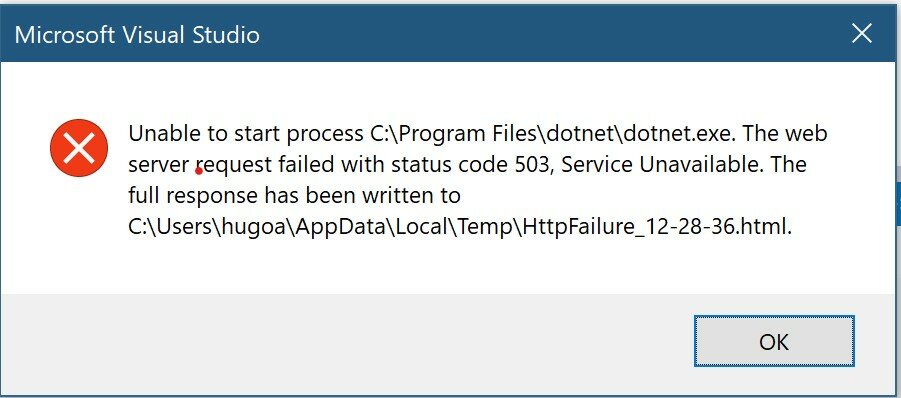
There’s just one problem: if you add a app_offline.htm file in your Visual Studio project, you won’t be able to debug it, because ASP.NET will do what it is supposed to do and report the application as offline.Visual Studio will report that the web request failed with a status code 503, Service Unavailable.Fortunately, ASP.NET is very literal about what file it looks for. If you just rename the file _app_offline.htm or app_online.htm or offliney_mcofflineface.htm, ASP.NET will ignore it — anything but app_offline.htm.So now all you need to do is to keep _app_offline.htm in your Visual Studio project and rename it to app_offline.htm before you deploy it.Fortunately, there’s a way to do this automatically using Web Deploy!
Automatically renaming _app_offline.htm when deploying using Web Deploy
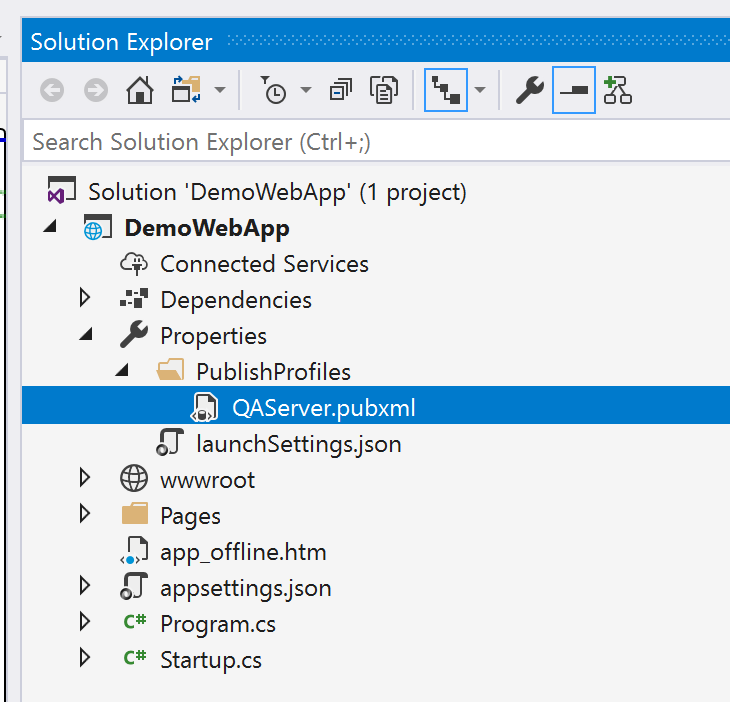
Lucky for us, Visual Studio’s web deploy profiles follow the MSBuild syntax and can be customized easily.You can find your web deploy profile in Visual Studio’s Solution Explorer under your web project’s properties >PublishProfiles folder.
If you open the file by double-clicking on it, you should see something that looks like this:
That’s something we can work with!MSBuild allows you to add custom actions (or targets) that can be triggered via events. For example, to create a new custom target called TakeOffline and display a message saying “Taking application offline” you would insert the following element in your pubxml file, just before the closing Project tag:
In the code above, the Importance is set to high to make the message appear in Visual Studio’s output window during the web publish.The custom target we created is set to be triggered after the BeforePublish event.To make the custom target rename the file, you can simply add a Copy command that copies the file called _app_offline.htm (located in your web project’s root folder) and rename it to app_offline.htm in the $(publishUrl) folder (your destination folder).
Save your pubxml file and publish your web app by right-clicking your web application’s project in Visual Studio’s Solution Explorer then select Publish… and click the Publish button.Great! Now your web application goes offline, displays a custom message to tell your users not to panic, and gets automatically deployed……but it doesn’t come back online when done… because ASP.NET still see an app_offline.htm file in your web application’s folder!Let’s fix that!
Automatically removing app_offline.htm after deployment is complete using Web Deploy
We can simply add another custom action, this one triggered by AfterPublish which deletes the file:
Just insert the above code before the Project close tag in your pubxml, save and re-deploy. This time the message will automatically go away once the project has been published.
Bonus Feature: Launch the site automatically after deployment
In case I haven’t said it before: I’m the world’s laziest developer. Case in point: I hate navigating to the web application’s web site when web deployment is complete.Fortunately, your pubxml (most likely) has a tag just for tag:
<SiteUrlToLaunchAfterPublish />
If you’re lucky, you might even see the app_offline.htm temporarily before your custom target removes the file and the page automatically refreshes itself to show the application online!
Honestly, you probably wouldn’t have to do this if you deployed your web app to Azure, use IIS deployment, or use CI/CD to automatically deploy after a successful build but if your client/employer is still using file shares to deploy web applications, this article should help you.I hope this helps someone! Let me know in the comments.
I tried it and works for Net Core. I don’t even need to put ‘TakeOffline;’ that suggested by Tanveer Ashraf into the PropertyGroup. But, I got no idea why this does not work for Net MVC.
This does not work. Neither the tutorial works nor the comment. It seems as the targets never get fired (no message as written above is visible inside the publish output windows.


 Fortunately, ASP.NET is very literal about what file it looks for. If you just rename the file _app_offline.htm or app_online.htm or offliney_mcofflineface.htm, ASP.NET will ignore it — anything but app_offline.htm.So now all you need to do is to keep _app_offline.htm in your Visual Studio project and rename it to app_offline.htm before you deploy it.Fortunately, there’s a way to do this automatically using Web Deploy!
6 Comments
Thank you so much for this, been looking all over for this… I can’t believe this isn’t built in functionality.
I’m glad I could help!
Hi
I tried it and works for Net Core. I don’t even need to put ‘TakeOffline;’ that suggested by Tanveer Ashraf into the PropertyGroup. But, I got no idea why this does not work for Net MVC.
Does anyone have any idea?
Thanks
This does not work. Neither the tutorial works nor the comment. It seems as the targets never get fired (no message as written above is visible inside the publish output windows.
if target task not working in visual studio publish, add below in PropertyGroup
TakeOffline;
if publish target task not working in visual studio, add below tag inside PropertyGroup
TakeOffline;