
Introduction
When using cloud-based services like Office 365 and the Power Platform, it can be challenging to integrate with your on-premises resources. All of a sudden, your on-premises databases, APIs, file shares, and even your existing on-premises SharePoint infrastructure become impossible to reach. At least, not without making some giant holes in your firewall.
At our recent Toronto Citizen Developer User Group meeting, my good friend demonstrated how to use the on-premises data gateway to access a custom web API running on his workstation from Power Automate.
He had rehearsed the demo earlier that day from our offices. Still, he had changed many environmental variables by moving his demo to our meetup venue. Luis ran a web API from his workstation, over a different network (the guest wifi at the Microsoft office), using a new IP address.
Let’s say that if his demo didn’t work, no one would have blamed him. Heck, I tried to run a web API project using a static IP address on my workstation earlier in the day, and I had issues getting it to work.
But the demo worked!
As Arthur C. Clarke once said: "Any sufficiently advanced technology is indistinguishable from magic.". In today’s blog post, I’ll explain how to use the on-premises data gateway to access your local resources from the Power Platform.
Maybe I can prove that the Data Gateway isn’t magic?
What is the On-Premises Data Gateway
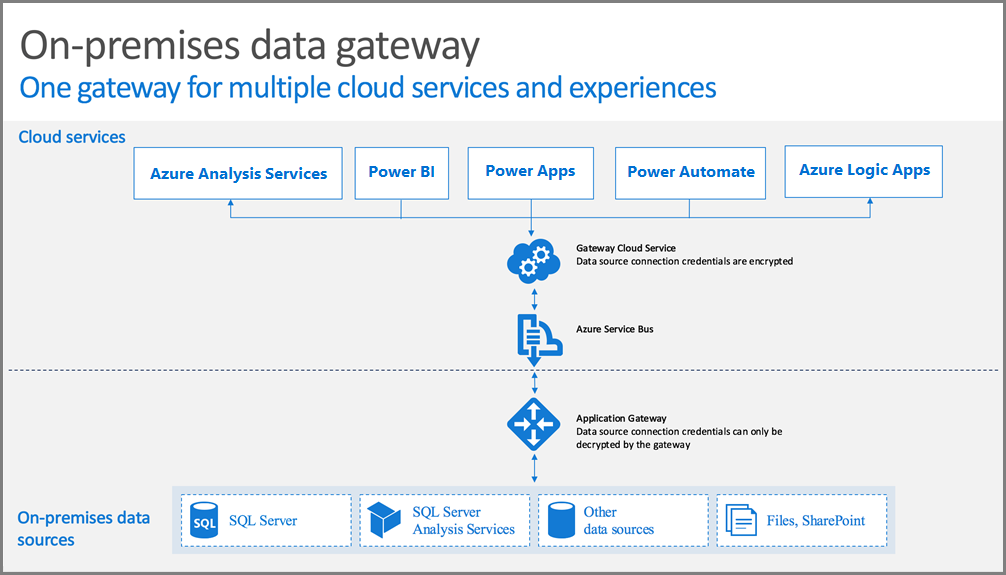
You have services in the cloud, like Power BI, Power Apps, Power Automated, Azure Analysis Services, or Azure Logic Apps.
Your data is not in the cloud. It sits on your company’s network behind firewalls.
The on-premises data gateway works as a sort of bridge that lets your cloud-based services work with your on-premises data.
But it does so securely without requiring you to punch any holes in your firewalls.
And it is fast!
How does it work?
Do you use some chat app at work? Maybe you use Microsoft Teams or Twitter?
When someone sends you a chat, they’re not connecting directly to your workstation over some obscure port.
When your friend sends you a chat message, they send it to a gateway service that is usually in the cloud.
The gateway service then tells your app that you received a new chat message and displays it for you.
The chat gateway knows how to reach you because when you signed-in with your chat app, the app contacted the gateway and said, "If you need to send me notifications, let me know! I’m right here".
It often uses the standard SSL ports (443) to keep prying eyes from intercepting your chat messages from the app to the gateway.
The on-premises gateway mostly works the same way. Except that instead of a chat app you install on your workstation, it is a Windows service you install anywhere on your network (e.g., your workstation or a server).
Instead of chat messages, it receives requests to retrieve data from available resources on that same network. It can also receive requests to update data.
When it launches, your on-premises gateway lets the cloud-based gateway service that it is ready. "Hey, let me know if you need any data. I’ll be here!".
When your Power App, Power Automate, or any of the other services needs data, it sends an encrypted request with credentials to the cloud gateway service.
The gateway service then sends that encrypted request to your on-premises gateway.
And your on-premises gateway decrypts the request, extracts the credentials, and connects to your data source with those credentials. It sends the query to the data source and, when it gets a response, sends the encrypted results back through the gateway service, which sends it to cloud service that requested the data in the first place.
Microsoft has a pretty diagram that explains the concept. I encourage you to read more about how it works on their site:
What are the requirements?
The good news is: you don’t need to punch any holes in your firewalls or anything like that.
However, you shouldn’t install the gateway on any rinky-dink computer. You need at least a 64-bit version of Windows 8 or Windows Server 2012 R2.
The machine should always be on and always connected to the Internet. Please don’t install it on a laptop that goes to sleep or puts the network adapter to sleep to save power.
Microsoft recommends an 8-core CPU with at least 8 GB of memory and a solid-state drive (SSD).
Try using a physical network connection over a wireless network.
The person installing the gateway on the device must also be the administrator of the gateway. You’ll need to have enough privileges on the computer you’ll be using to be able to install the application.
You can only install one type of gateway per computer (yeah, there are more than one types of gateway — we’ll explain later)
If you’re planning on using Windows credentials in your data sources, your gateway should go on a domain-joined machine.
And please don’t install the gateway on a domain controller.
How do I install a gateway?
At the risk of repeating myself: you’ll want to install gateways on computers that are always on and connected to the Internet.
The steps below are the same installation steps provided by Microsoft; you should check their instructions to see if they have updated.
-
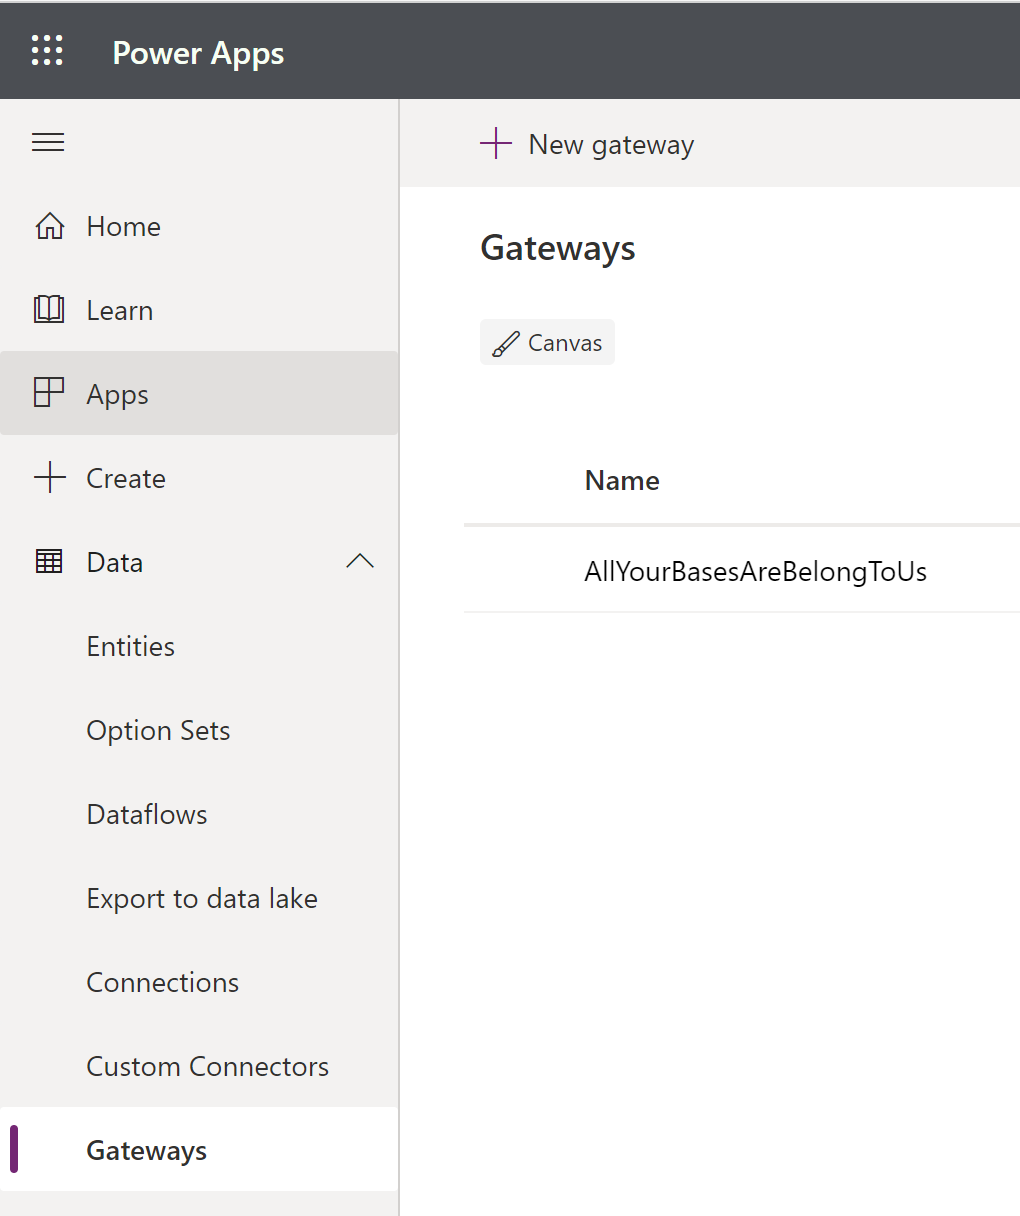
Download the gateway. You can also download the gateway from any cloud service that supports gateways. For example, in Power Apps, you can go to Data > Gateways > + New gateway.
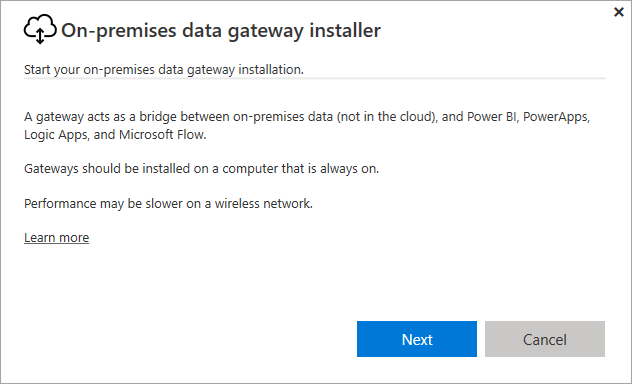
- Launch the installer and select Next.
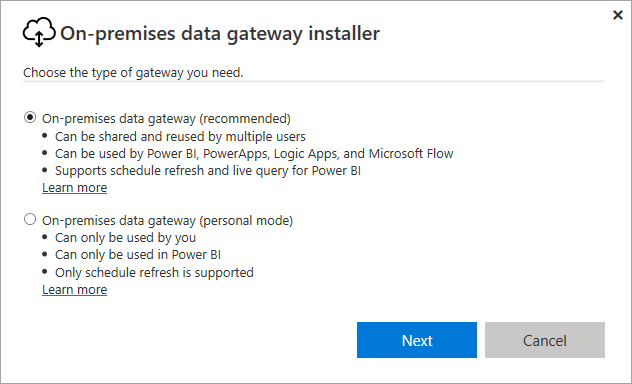
- When it prompts you to choose the type of gateway you need, select On-premises data gateway (recommended) and select Next. Like I said earlier, there is another version of the gateway called the "personal mode," but it is intended to be used by you and with Power BI only.
- You may or may not get a warning saying that the gateway should be installed on a computer that is always on. You can just select Next.
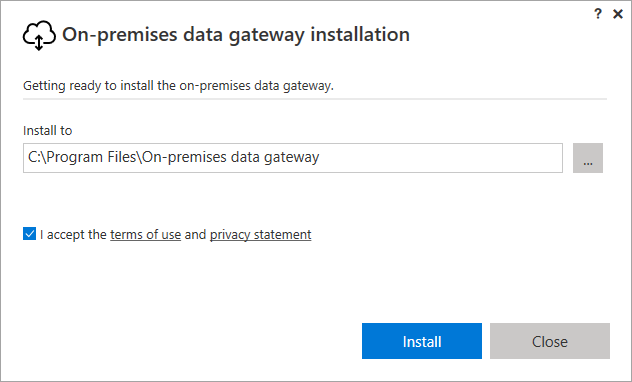
- It’ll prompt you for an installation path and to accept the terms of use. Pretend to read the terms of use and privacy statement, select the checkbox then select Install.
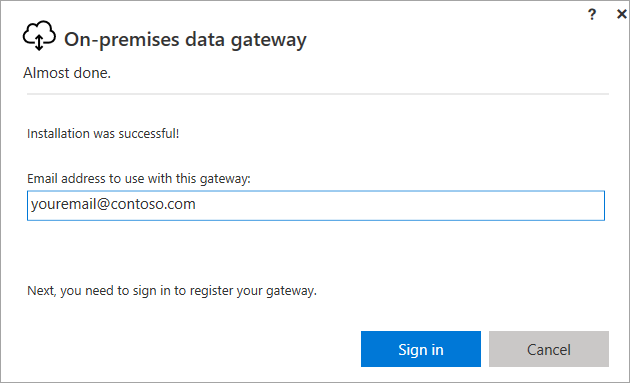
- You’ll need to enter the Email address to use with this gateway. Use the Office 365 email address who will become the administrator for this gateway, then select Sign in. You’ll probably be prompted to sign-in.
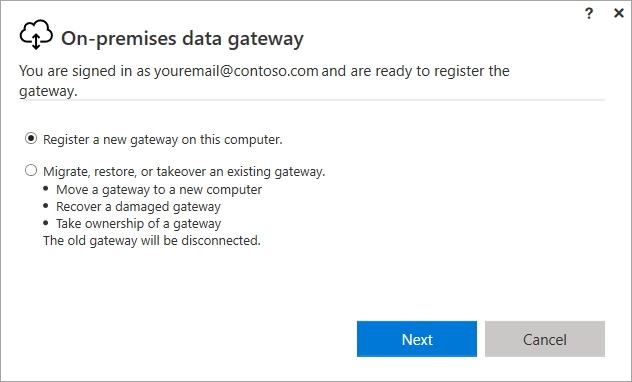
- If all goes well, it’ll say that you’re signed in. It will ask you if you want to register a new gateway or migrate, restore, or takeover another gateway. Since you’re here, I’ll assume you want to select Register a new gateway on this computer and select Next.
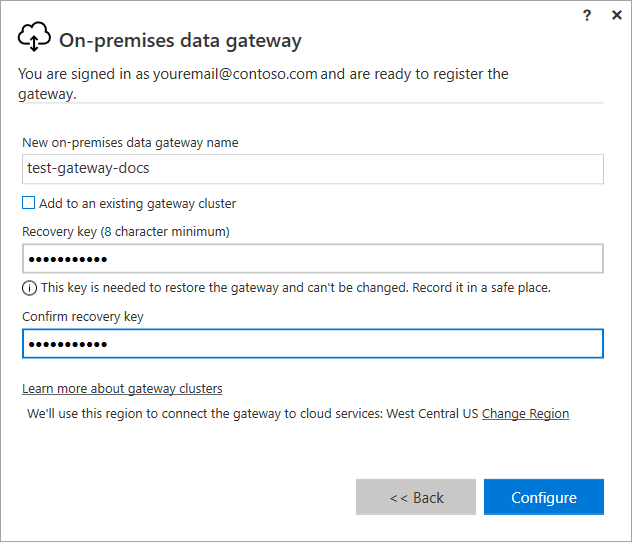
- It will ask you to enter a New on-premises data gateway name. Make sure to use a unique name that will make it easy to distinguish it from others (i.e., not Gateway). You’ll also be asked for a Recovery key — that’s an 8-character or longer secret you’ll use if you ever need to recover a gateway. You can make up whatever recovery key you want, but make sure you store it somewhere safe! If you were adding a gateway to an existing cluster, this is where you would specify to join the cluster. Feel free to read Microsoft’s instructions to add to an existing cluster if you want. Select Configure.
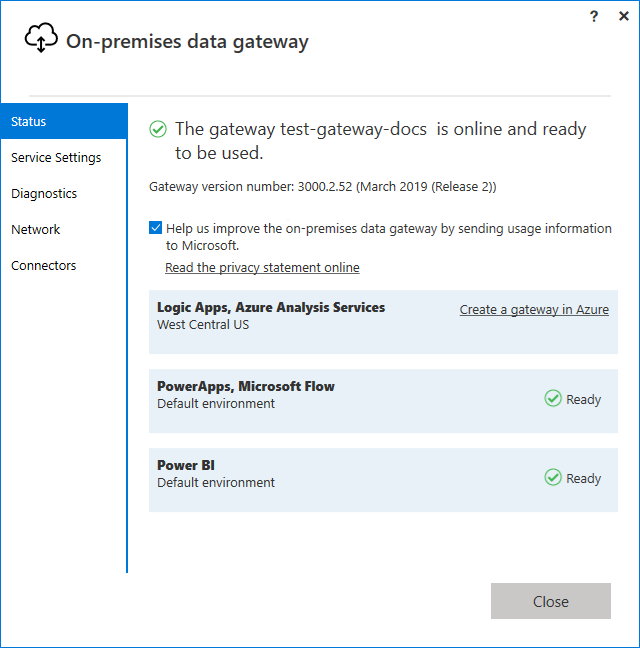
- If all goes well, you’ll get a message saying the gateway is online and ready to be used. Yay! Select Close. Since the gateway works with Power Apps, Power Automate, Power BI, and Azure, it’ll show you all which services it connects to. Usually, the Azure service is not connected by default, but you can select Create a gateway in Azure if you want.
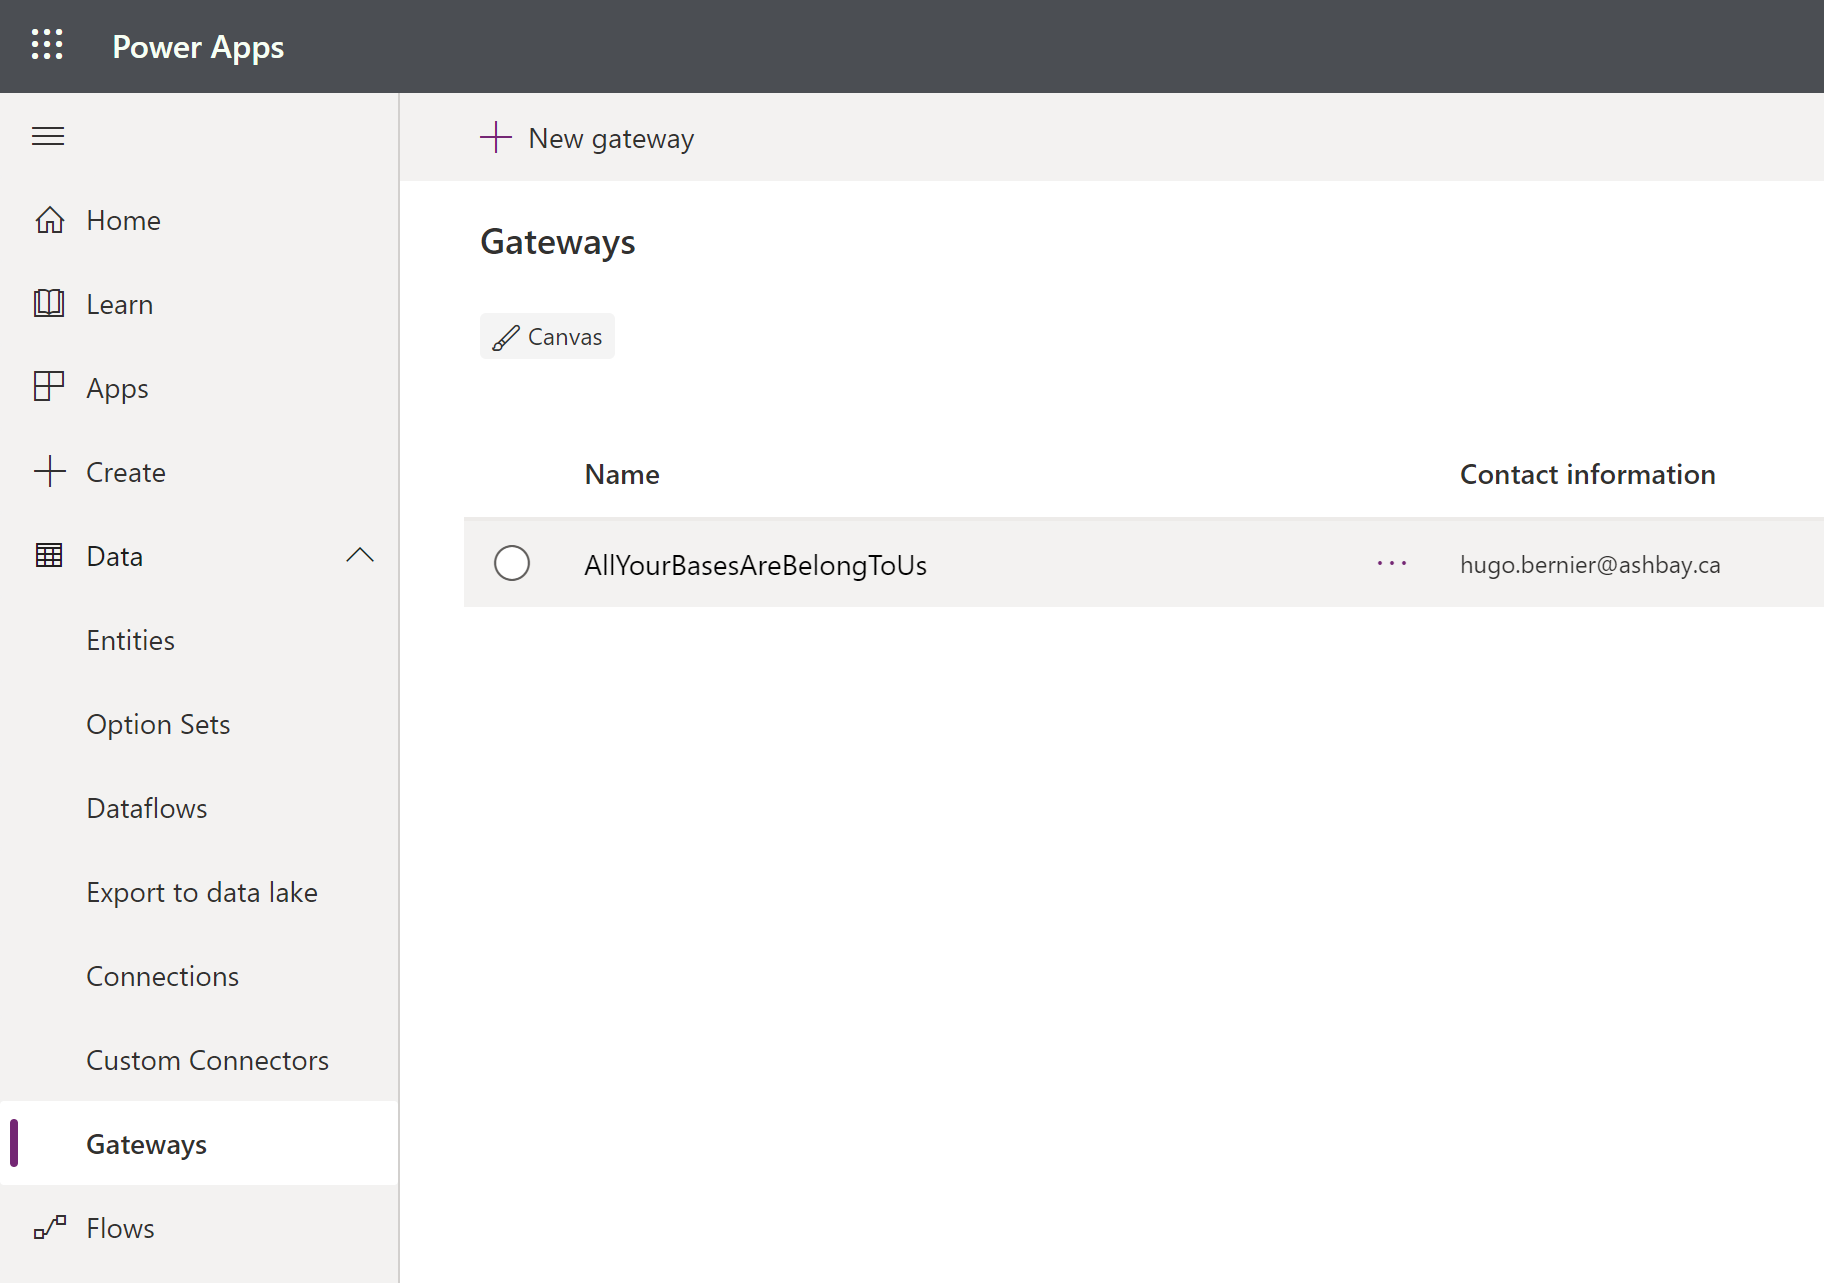
If all goes well, you should find your gateway in the Power Platform site. For example, in Power Apps, you would go to Data > Gateways in your default environment.
You’re done! Now you’re ready to use the on-premises data gateway!
To use an on-premises data gateway with a standard connector
To use your gateway, just create a connection for one of the gateway-enabled connectors.
Right now, it works with the following connectors:
- Apache Impala
- DB2
- File System
- Http with Azure AD
- Informix
- MySQL
- Oracle Database
- PostgreSQL
- SharePoint
- SQL Server
- Teradata
To use SQL Server
For example, to create a connection in Power Apps, follow these steps:
- Log-in to Power Apps
- From the left navigation, select Data then Connections
- Select + New connection
- Select a connector from the list. For this example, we’ll select SQL Server
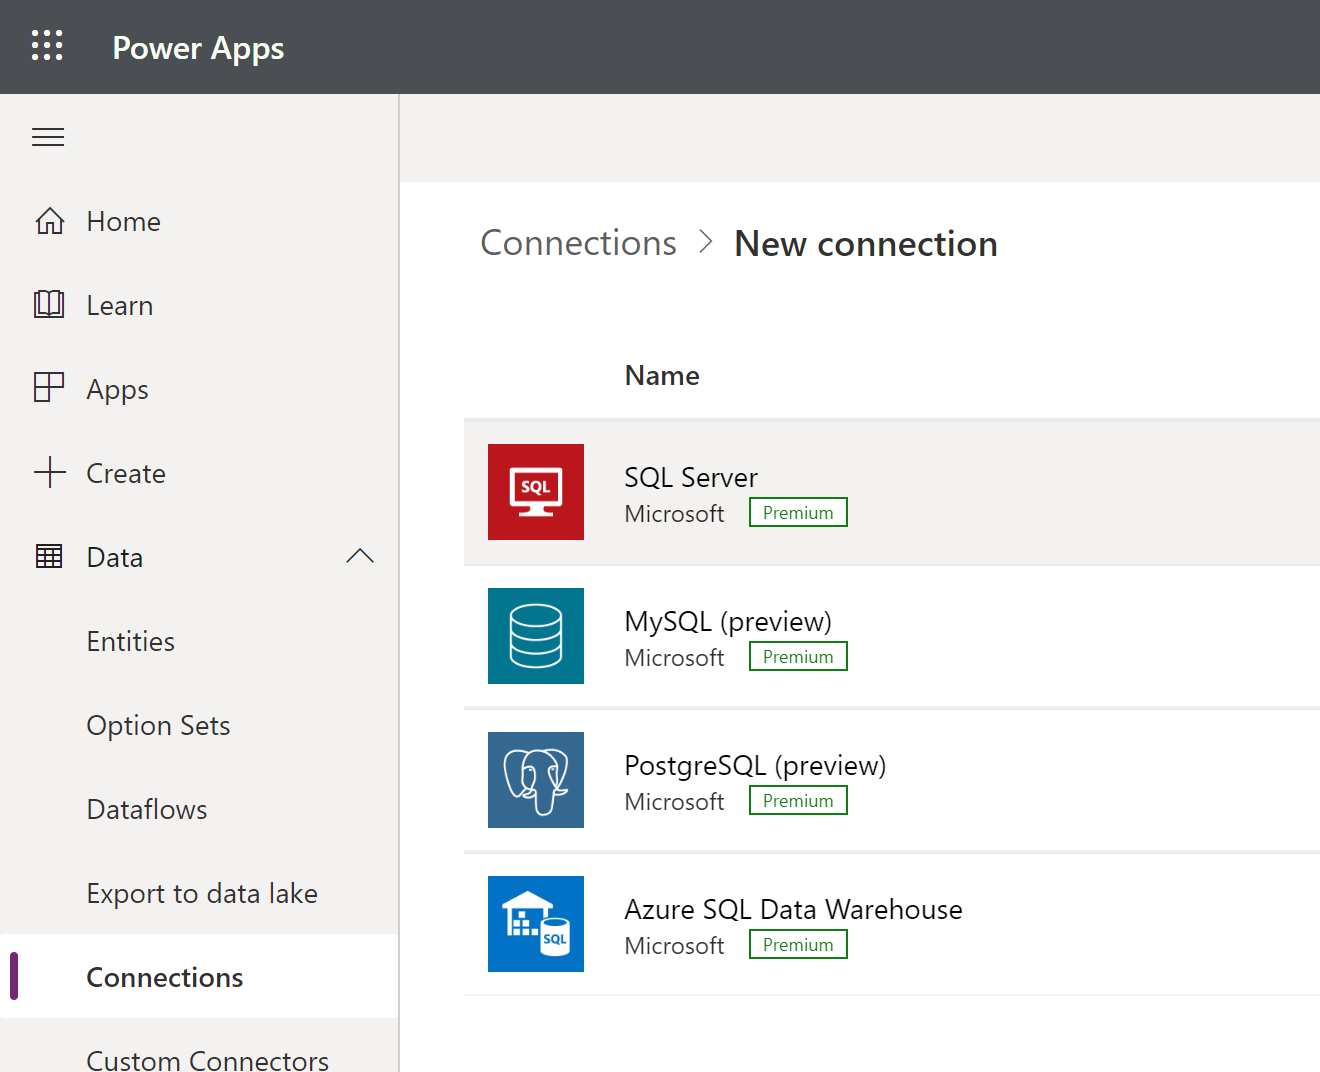
- A dialog that is specific to the type of connector will pop-up. Note that, depending on the connector, the option to connect to a gateway may only appear based on what configuration you choose. For example, SQL Server does not let you use a gateway when your Authentication Type is Azure AD Integrated. It makes sense since that option is for cloud-based SQL Server connections.
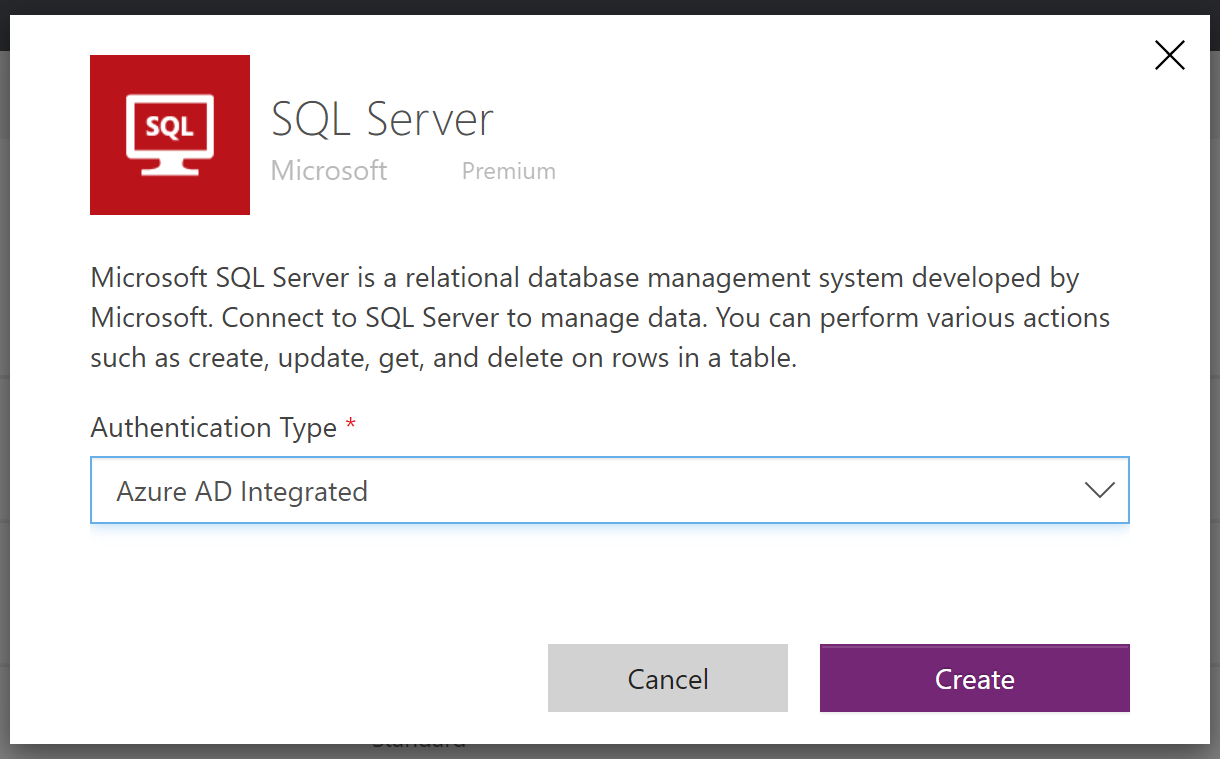
- To use a gateway connection, you’ll need to select either SQL Server Authentication or Windows Authentication
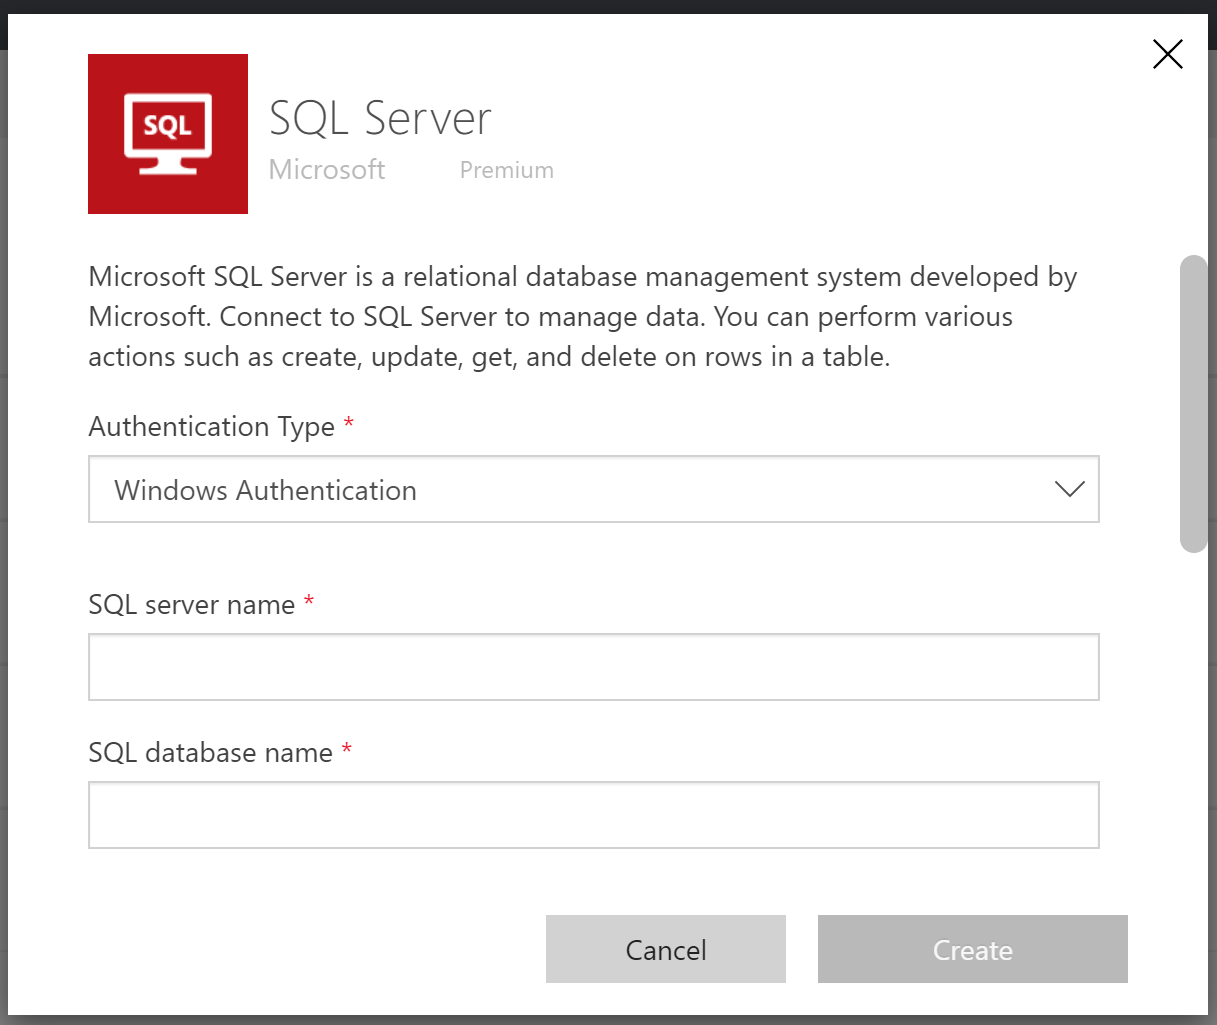
- If you scroll to the bottom of the configuration dialog, you should see an option to Choose a gateway
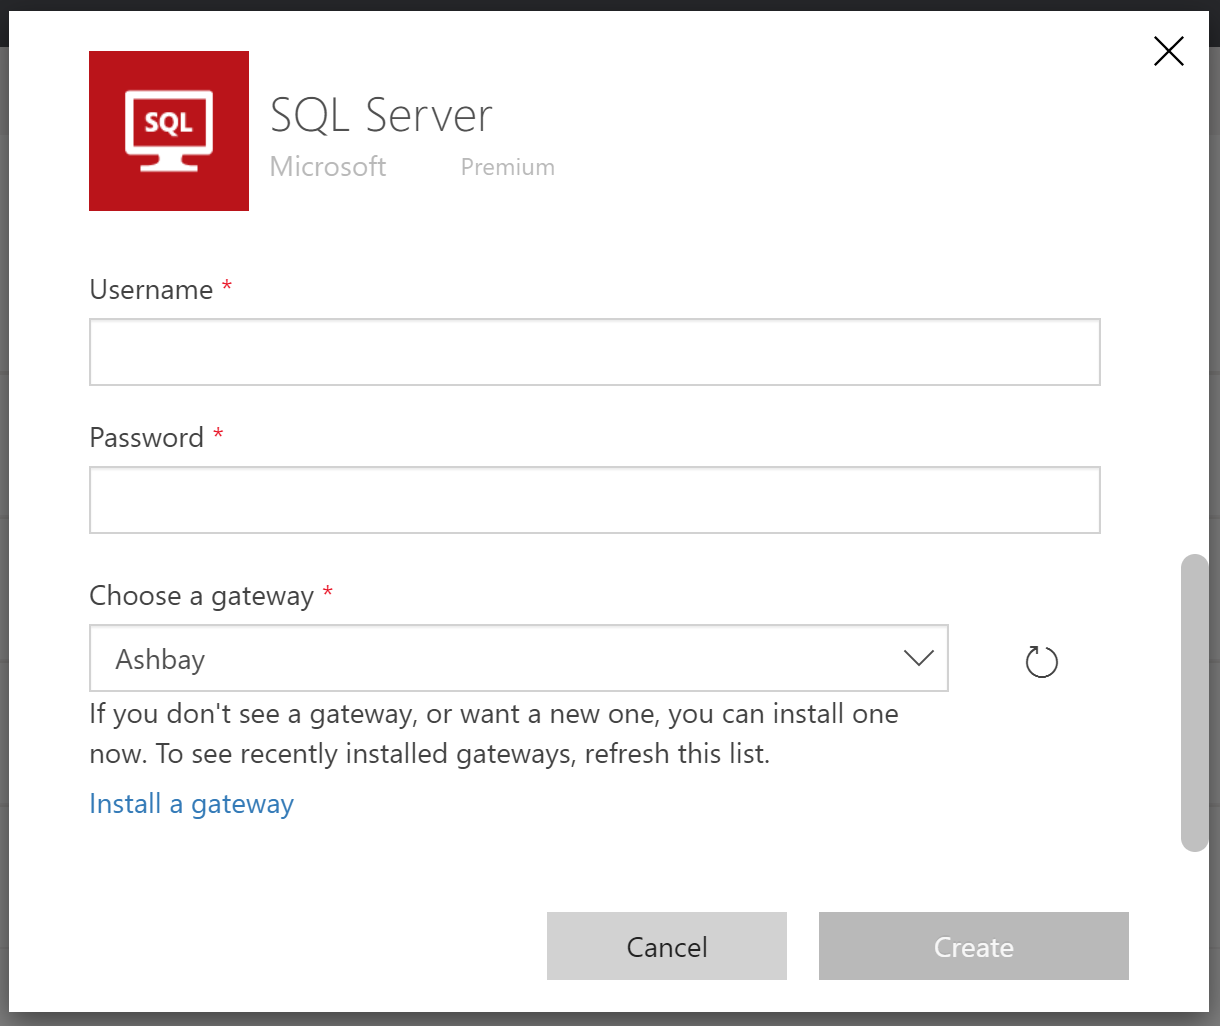
If you didn’t install your gateway yet, you could install it from the link below the Choose a gateway then hit the Refresh icon to show your newly installed gateway. - Fill the configuration information (SQL server name, SQL database name, and credentials), then select your gateway and select Create.
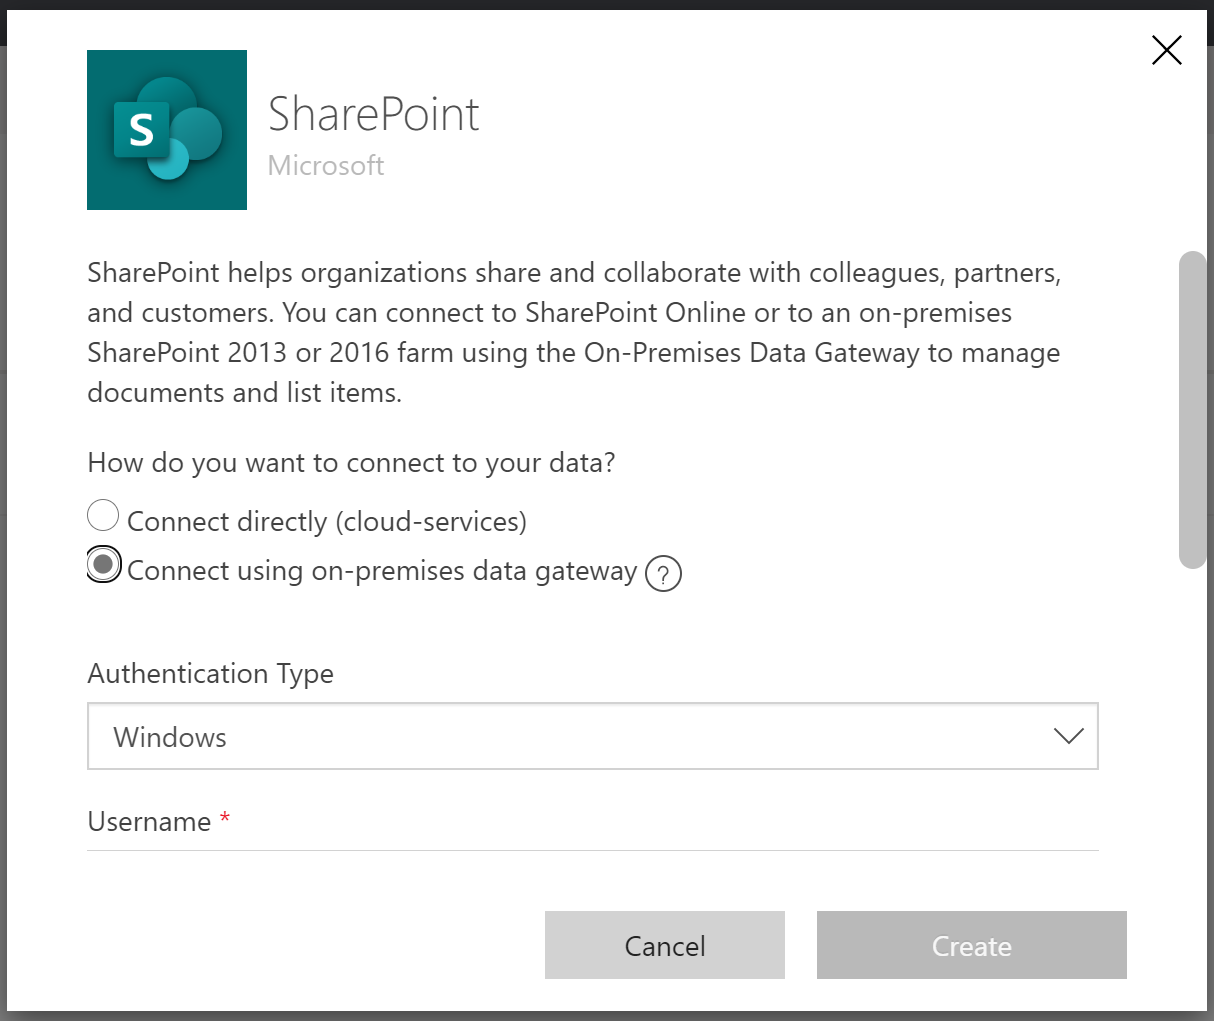
To use SharePoint
Some other connectors may prompt you to select at the start of your connection. For example, if you create a SharePoint connection, the first thing you’ll see is this option:
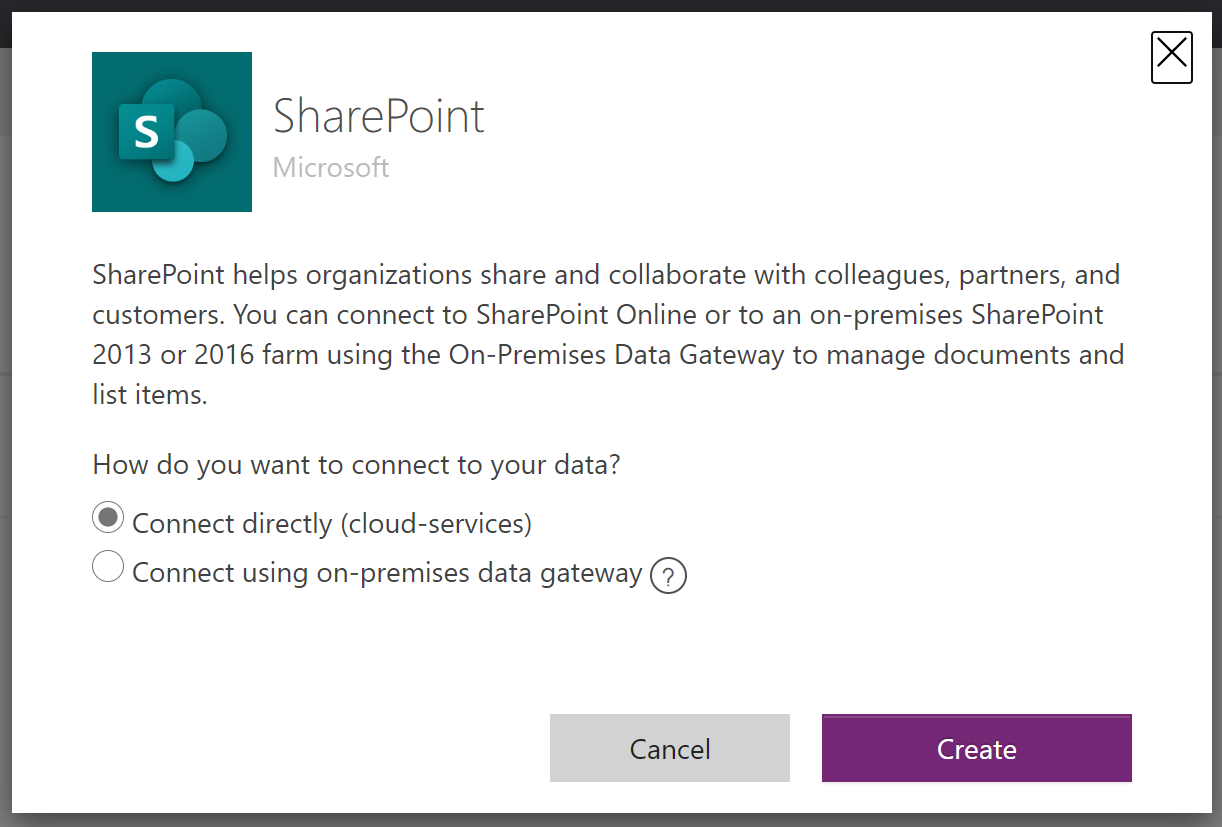
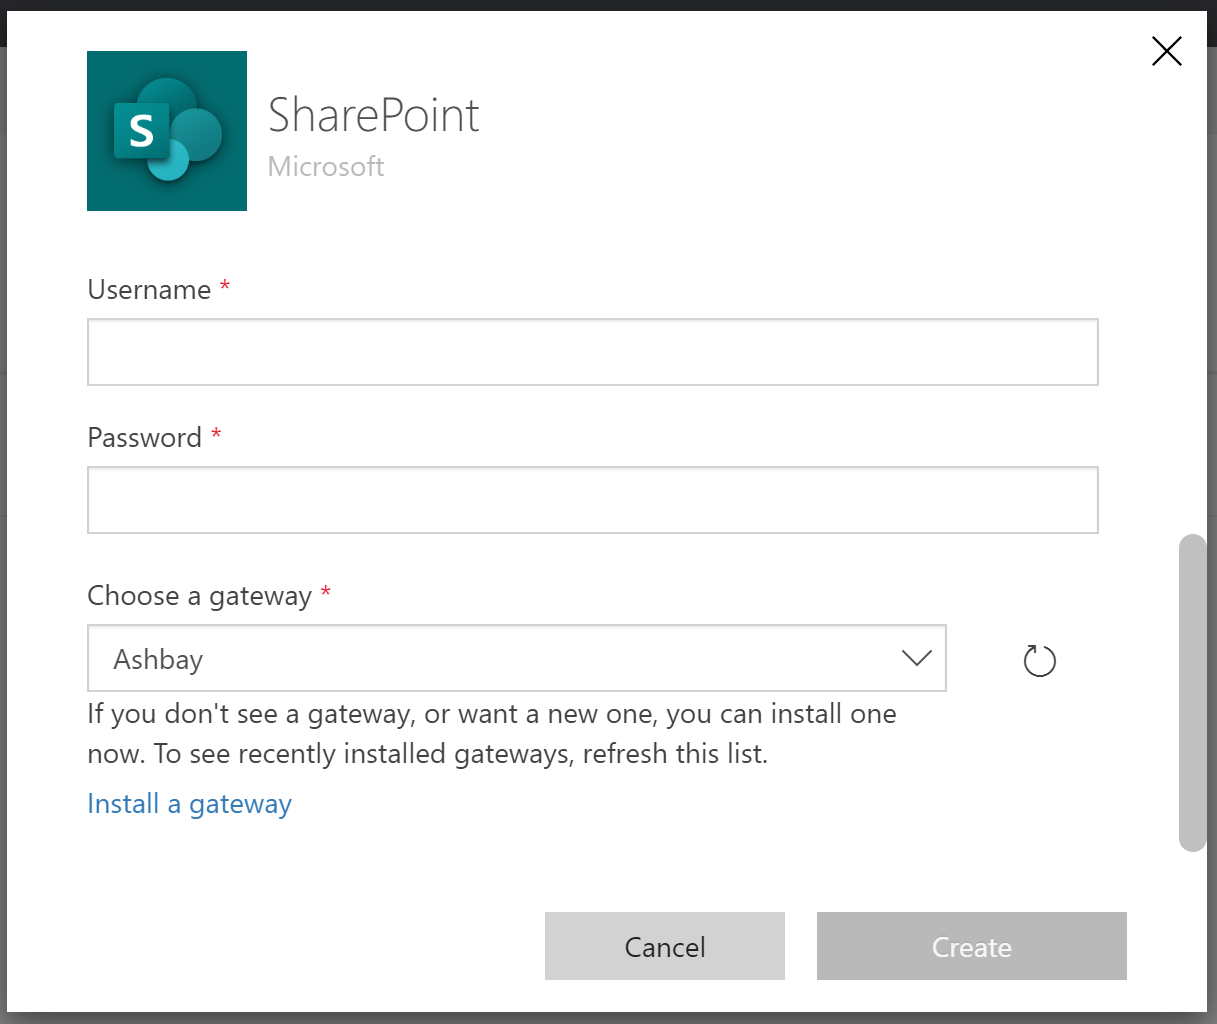
And if you select Connect using an on-premises data gateway, you’ll get prompted to enter more details:
If you scroll to the bottom of the configuration dialog, it’ll prompt you to select a gateway:
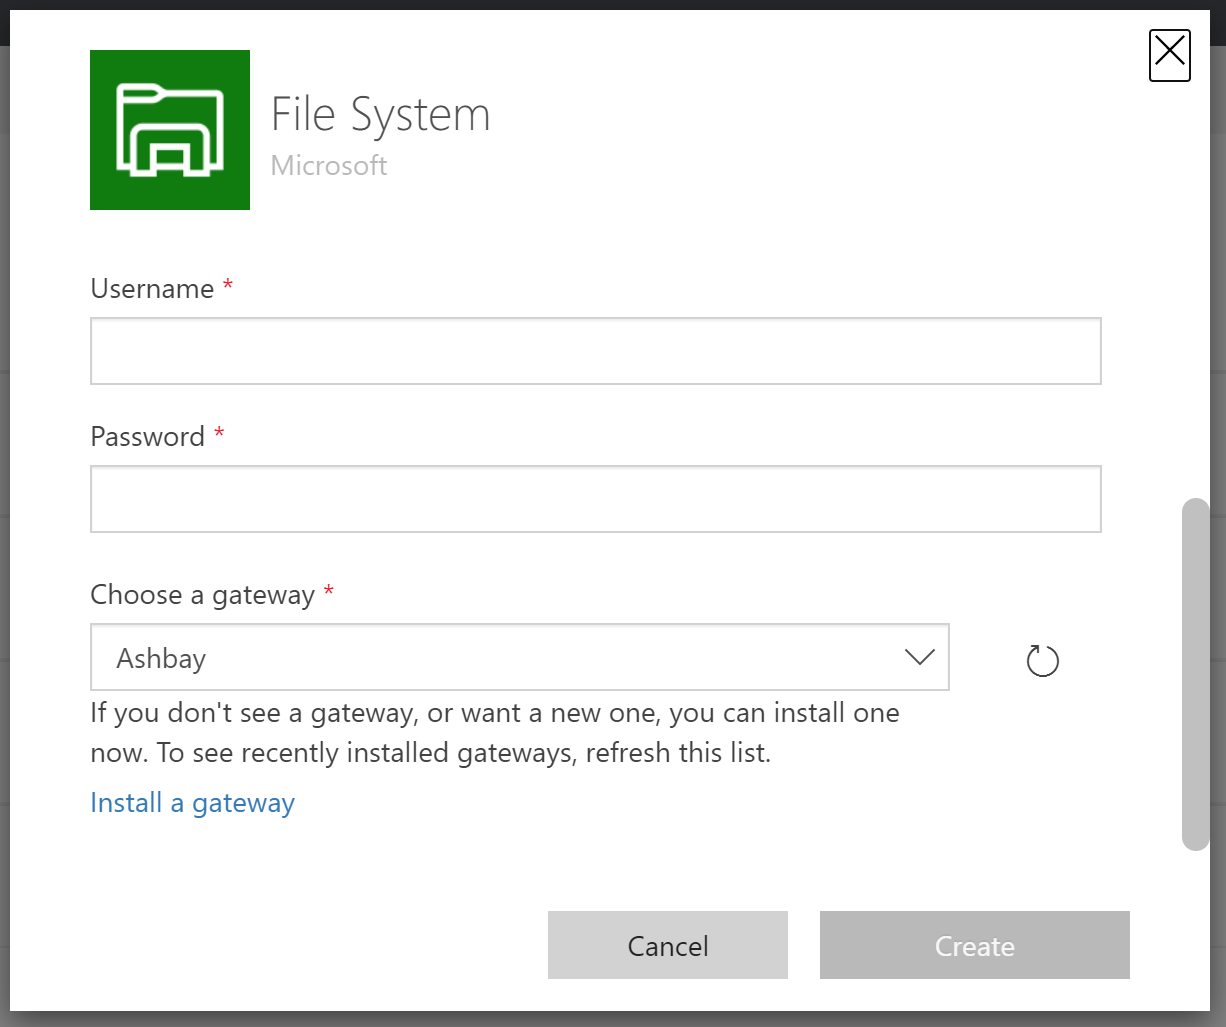
To use the File System
When some connectors only work with on-premises data, you’ll have to select a gateway right away. For example, when creating a connection to your on-premises File System, you’ll get the following dialog:

And if you fill all the configuration details, the last option is to select a gateway:
Using a gateway with a custom connector
You can also use an on-premises data gateway with custom connectors.
For example, let’s say you have an API that is only available within your on-premises network, but you want to call it from within Power Apps or Power Automate. You would follow these steps:
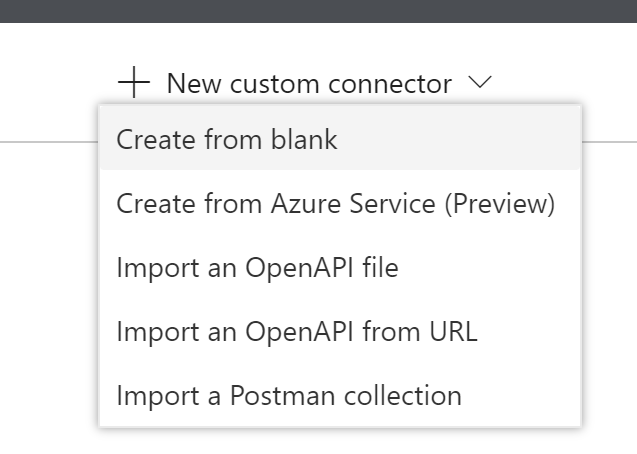
- Log-in to Power Apps
- From the left navigation, select Data then Custom Connectors
- Select + New custom connector and pick how you want to define the custom connector. This article is already super-long, so I’ll spare you the details here, but leave a comment if you want more information about how to create a custom connector.
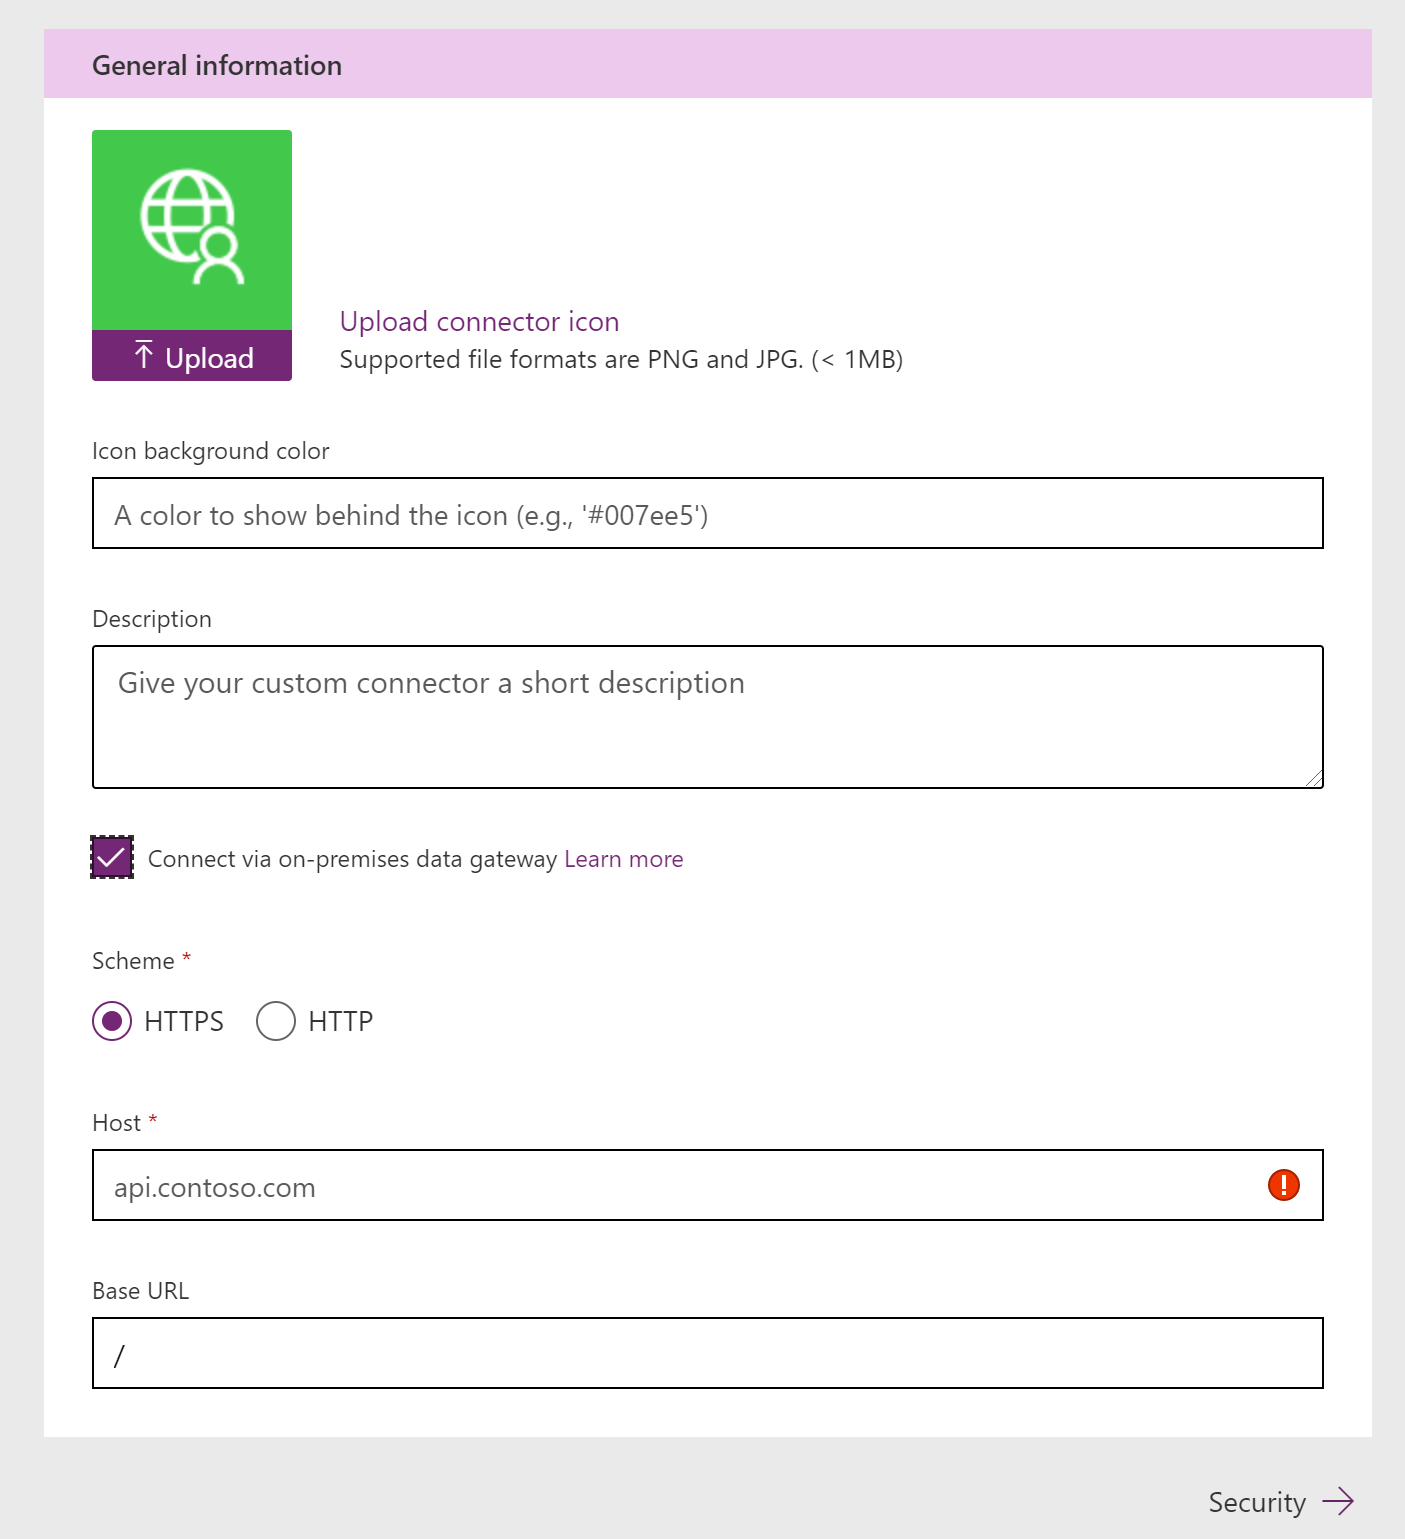
- Eventually, you’ll get to the General information step. This is where you select Connect via an on-premises data gateway
- Finish the custom connector steps.
You’ll be prompted to select a gateway only when you create a connection with your new custom connector.
How to use a gateway connection?
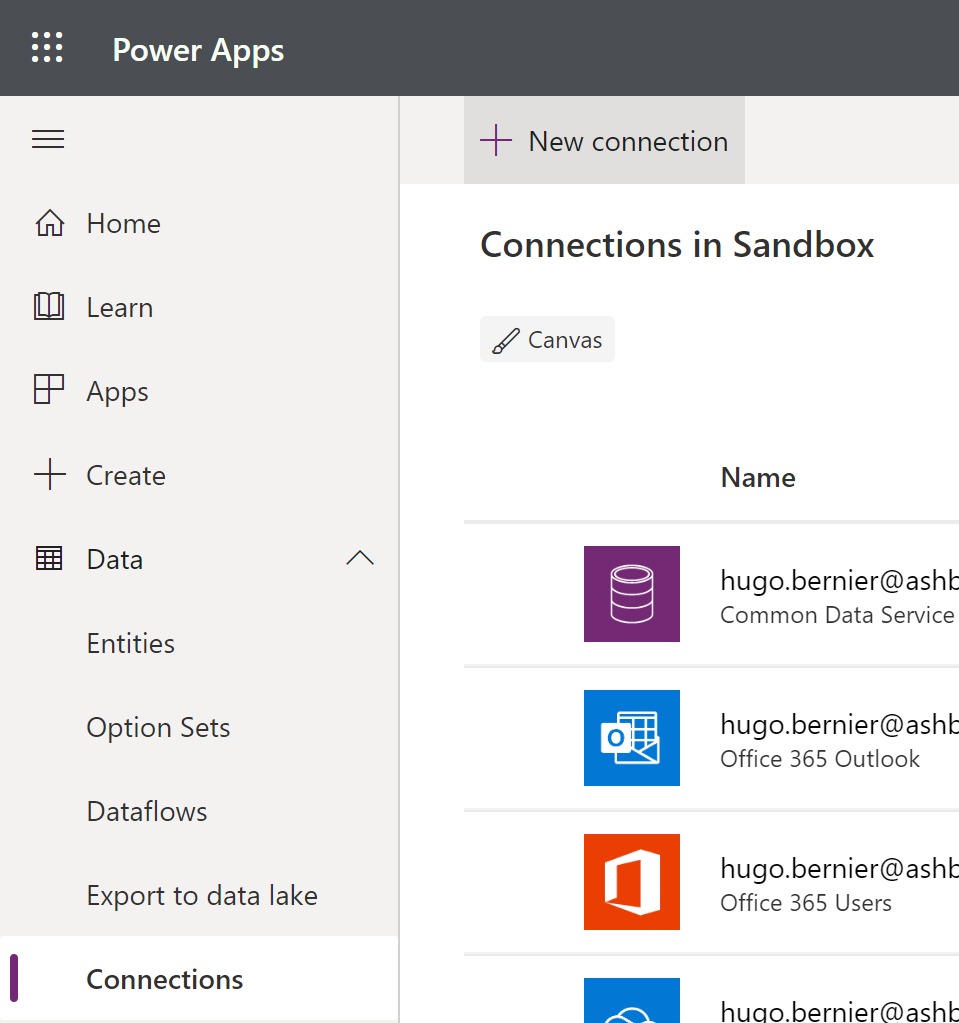
Your gateway connections will appear in your list of connections, just like cloud-based connections. You can use them as any other regular connections within your apps.
It may not always be obvious that you can connect to an on-premises resource. For example, let’s say you want to create a new Flow with Power Automate that launches when a new file is created on your on-premises SharePoint server. You would follow these steps:
- Make sure to create your gateway first!
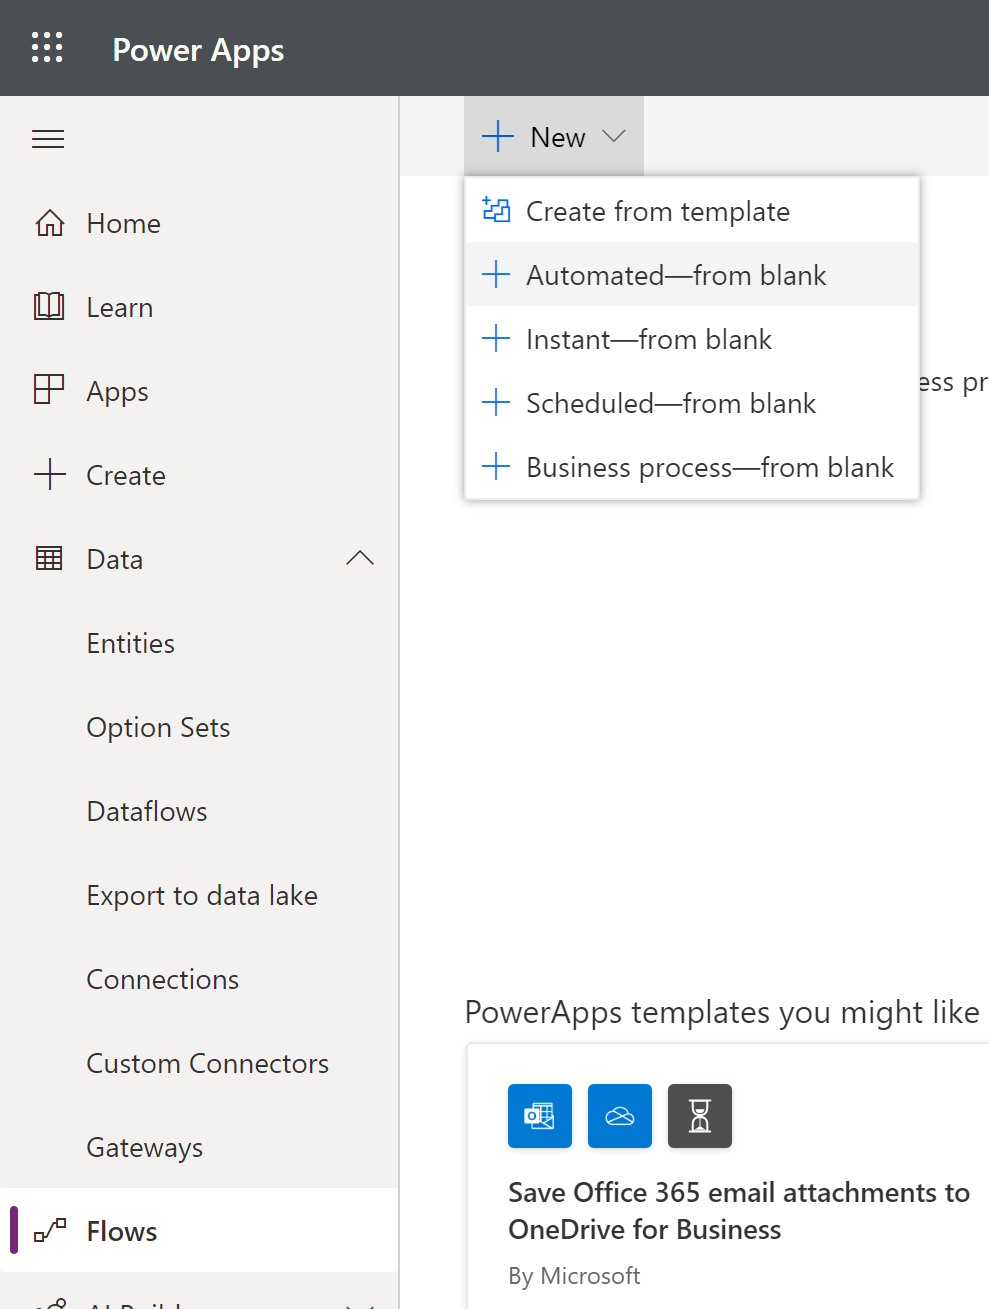
- From within https://make.powerapps.com, select Flows then + New > + Automated — from blank
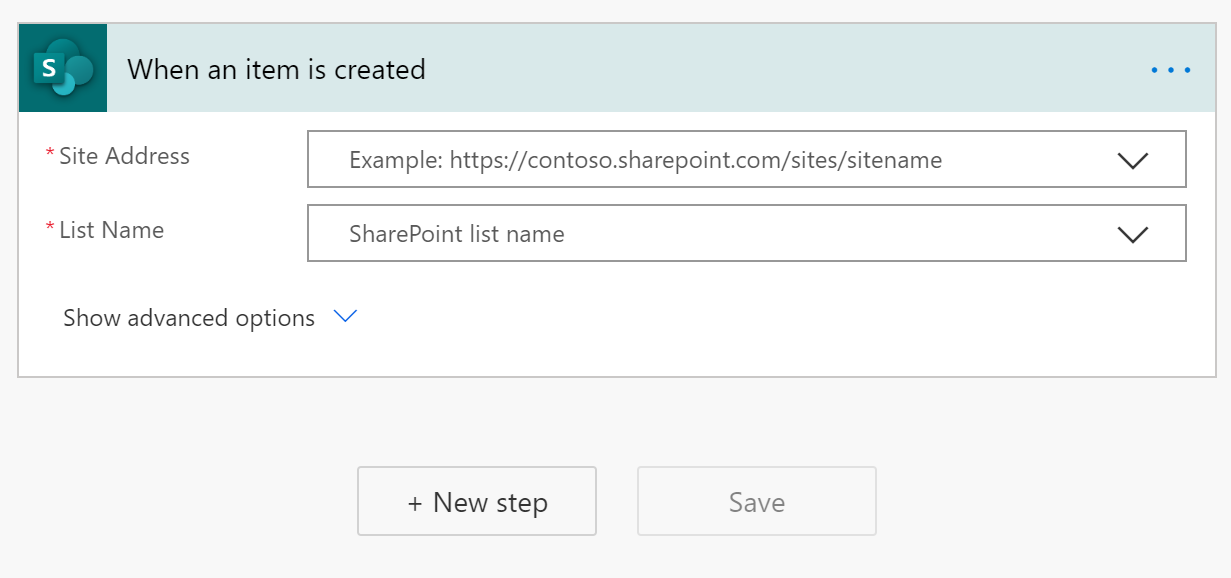
- In the dialog that pops up, you would name your Flow and select When a new item is created under SharePoint, and select Create

- Your new Flow will prompt you to select enter a URL to your SharePoint site Site address and select a List Name.
- This is where it gets tricky: if you enter the URL of your on-premises SharePoint site, Flow may simply tell you ‘Site Address’ is required and ignore the URL you entered.
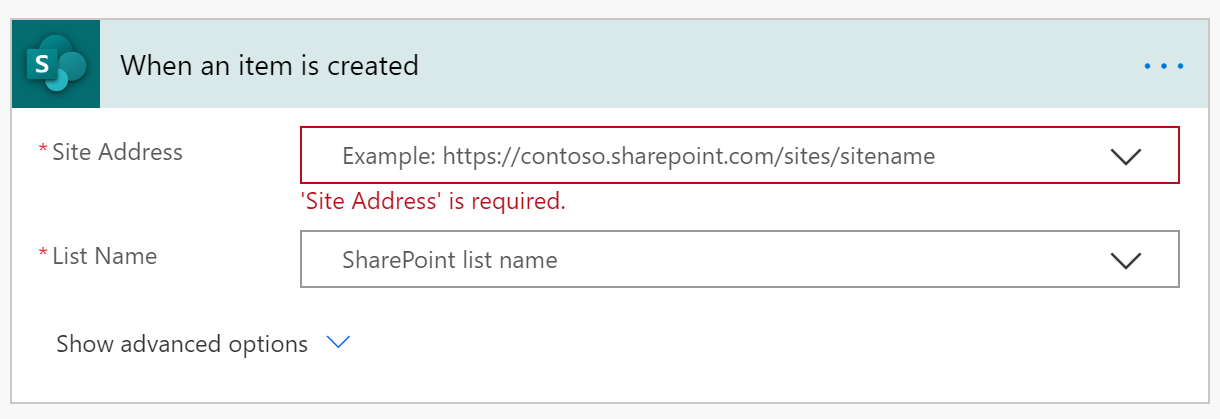
- That’s most likely because the default connection for SharePoint actions is for your SharePoint Online instance. You can change your action’s connection by using the … and select your on-premises connection from under My connections
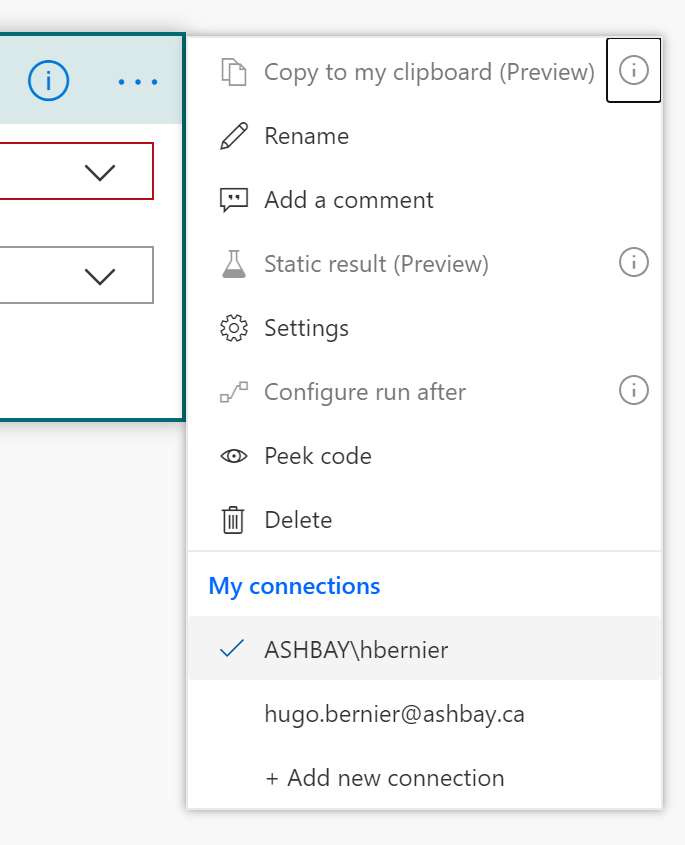
You can tell which one is your on-premises connection because its default name will be the name of the user you specified when you created the connection. - Once you change your connection, you should be able to enter the URL to your on-premises SharePoint site, and it should work.
Note that you can also have multiple SharePoint actions in your Flow, and each one can use a different connection. It could come in handy if you wanted to move files from SharePoint on-premises to your SharePoint online instance, for example.
How about support for environments?
The Power Platform allows you to define environments to separate your production data from your sandbox, dev, and test data.
Unfortunately, as of this writing, the on-premises data gateways only work with the default environment on your tenant.
If you need to create a Power App or a Flow that use the gateway, they must also be in the default environment.
It means that your apps and Flows must also be in the same region as your default environment.
It is a serious limitation, and the Power Platform team is aware of this.
They’re super busy adding new features all the time, so you can’t blame them if it hasn’t been a priority for them.
I’m sure that one day they’ll get around to adding support for non-default environments, but until then, feel free to provide them with feedback.
Conclusion
They may seem magical, but on-premises data gateways allow you to access your on-premises data from the cloud in a secure way, and it is very fast and easy to use.
You should definitely consider establishing some form of governance before you use on-premises data gateways, but that’s a topic for another day.
I hope this helps?
Thanks
Thanks to for doing all the hard work for our user group presentation. I simply recapped what he said in this post.


